Welcome!

Come take a trip with me on my wild ride as the mother of 3 sweet "babies".

Thursday, June 7, 2012

Ballerina Party

My oldest turned 6 in April.  She requested a ballerina party, and so off to the store I went for tulle, tulle and some more tulle.  She was pleased with the outcome, and I was, tutu (er... too).
The tutus were the first thing I made - all 13 of them! They're super easy.  For a tutorial, go here. I used elastic headbands instead of regular elastic, and I cut each piece of tulle 24 inches long.  I made my daughter's tutu twice as full as all of the other partygoers.  She was the prima ballerina, after all!

 This decoration was two Pinterest projects in one! I was inspired by this tutu wreath, and the tutu fan (that's what I call it!) found here. I made an extra B for the treat table, and spelled out her name with the fans on the mantle. The wreath has found a permanent home on the outside of my daughter's door, so it was a worthwhile project for sure!

 For food, we had cupcakes - strawberry and marachino cherry. If you're in Johnson County, KS, hit up Darby's Delights.  Seriously the best cupcakes I've ever had, and she offers many yummy flavors!  We also served up a veggie tray (the girls DEVOURED it), Chex Mix, and water bottles.  I covered my white tablecloth with a pink organza table cloth and surrounded the pink and white serving dishes with pink and purple tutus. A vase of flowers added a nice touch.


What happens when you remove the table and chairs from your kitchen?  You get a fabulous dance floor! Perfect for a bevy of beautiful, budding ballerinas!
 Keeping with the ballet theme, I added my swan candle holder at the last minute. Could it be the swan princess, Odette? 
My duo of delicate dancers and their dashing Dapper Dan. (yes, I love alliteration!)


The girls were inspired right away to get to it - even before the guests started to arrive. I wish I could post pics of the party - it was quite a sight with all the girls in their tutus, but as always, I respect the privacy of my friends and family, and only post pics of my own kiddos. 

Wednesday, January 11, 2012

Magnetic Shadow Box / Shelf Tutorial

I have been looking at items around my home trying to find something to repurpose.  I came across 2 shallow canvas bins that I purchased years ago to fill a space in a broken dresser.  This morning, they were full of kids books stashed under our bed.  This evening, they house treasures displayed proudly on my daughters' walls. I have seen many tutes online for fabric covered magnetic boards and bulletin boards,  but nothing exactly like this, so I figured I'd post my how-to!  It's simple, and because I used what I already had (for the most part) it was super inexpensive.  I spent a total of around $7 - and that includes tax.


You will need:
  • Spray adhesive
  • Shallow bin
  • Metal sheeting (I got mine from Home Depot in the with the air duct materials
  • Fabric (not too thick) - I used the flat sheets that came with my girls' bedding sets.  I don't use them on their beds because they always kick them off anyway.  We're a fitted-sheet-plus-blankets kind of family. 
  • An iron/ironing board
  • Glue gun
  • Wall screws
  • Scissors
  • Possibly some tin snips


 First, you need to cut the metal sheeting to the size you need for the back of your "new" shadow box.  If you go to Home Depot looking haggard and tired while dragging along your three small children, they MAY take pity on you as well, and cut the metal for you.  But you didn't hear it from me! -No, really.  The guy told me to not let ANYONE know that he did that for me (so I post it on my blog!).  I guess they don't like doing it.  But I looked pathetic enough.  If you aren't as lucky as me, you'll need to borrow or buy a pair of tin snips.  They are about $8 at a hardware store.  It's a good idea to take the box along with you to the store if they are going to cut the metal sheet, because if it's just a bit too big, it isn't going to fit.  You'd hate to get home and find that your metal is too big to work!  Be sure to test to make sure it fits before you put the fabric on for sure!

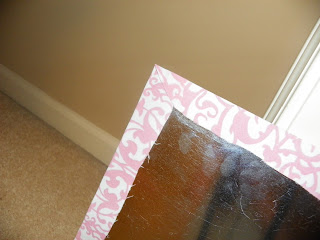
Next, cut your fabric so it hangs over the metal about an inch or more all around.  Spray adhesive on one side of the metal, and lay your fabric down. Be sure to smooth out any wrinkles or bubbles. 


Then, turn the sheet over.  Spray the excess fabric with adhesive, and wrap it tightly around the back of the metal sheet.  Do this all the way around.  You may want to snip the corners a bit, so you don't have big bunches of fabric in each corner.
 I don't have a picture for the next step, but you will want to locate a stud in the wall, and screw the box directly onto the wall (without the metal sheet in yet) via the stud.  We put two screws in so that it's secure.  After it's mounted on the wall, use the hot glue gun to glue the sheet into place at the back of the shadow box. This way, the screws don't show, and all you see is the pretty fabric.  Voila!  A simple and very inexpensive project.  The girls are happy with the results.  They each got to pic out 3 magnets that we had made months ago to put in the back (tute on those, here).  They will use these to display pictures of their friends. What do you think?


Of course, I had to make two!

My New Obsession


 Pinterest.  If you don't know what it is yet, look it up.  It's fantastic, and it has the potential to draw you in for HOURS at a time.  I have pinned many craft, sewing and other project ideas along with ideas for the next house we build, funny quotes and birthday party ideas.  I am trying my best to make sure I actually DO some of the things I pin instead of wasting my time on absolutely nothing.
My first Pinterest project was based on this tute: Pinup Wreath  I decided to spray paint the hoop and the clothespins first (disassemble the clothespins prior to painting) and then I decoupaged decorative paper around the hoop and on the tops of the pins.  Gotta love a practical craft! I've been wanting a good way to display my Christmas cards for years!

 Another great project was this one: felt heart.  It was time consuming, but really easy.  I recommend using full size straight pins, and not just the little applique pins.  I made that mistake to start.  The final product is beautiful.  Loads of impact for a small price tag - less than $10 total.
If you haven't already become obsessed with Pinterest, then you probably have a cleaner house than me!  I'm just glad that I'm making my pins become reality in my home.  I'll be working on some more projects soon!

Room 6: The Stairs!

 I do realize that the stairs are not technically a "room," however, it took some doing, and was in need of an update.  The builder's grade carpet that used to be in the living room was also going up the stairs.  We had enough carpet left over from our living room job to cover the stairs as well, so Jerry got to work - with some help from his dad to cut the carpet pieces.

 Jerry got to work ripping up the old carpet.  Looked like LOADS of fun!  After the carpet was gone, he still had to go back and rip up all the padding and tack strips along with all the extra staples.  Oh joy!
Putty and sanded the rise.
Rise painted to match the trim.

Ahh - gorgeous!  So much nicer looking (and feeling) than our crappy old carpet!

Good job, Handy Hubby!  The stairs look fantastic!  Now we can look forward to this summer when we paint the walls in the front hall and up the stairs.  That will be great fun... right?  RIGHT?